To make changes to one EDI Tender, first select it by left clicking in the box to the left of the line. Next, left click on “Edit” on the “Action Bar”. (As below) Reminder: Left clicking on the “Update” button when viewing an EDI Tender will allow changes as well.

When in “Edit” mode, the user can “Decline”, “Ignore” or “Accept” the Tender. “Reinstate” action button only becomes available if the tender has been declined or cancelled. (As below)

Update any applicable information. Fields on the worksheet that are “grayed out” will not allow changes. Once any changes have been made, left click on the “Save” button located under the “Tender” # at the top left of the screen. (As below)
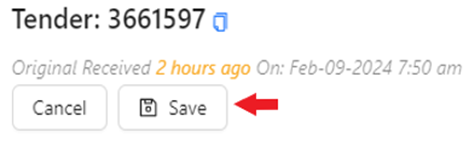
NOTE: To abort the edit or update process, left click on the “Cancel” button above. The below message will display. Left click on the blue “OK” button to confirm any changes made will not be saved and to exit “Edit” mode. Left click on the “Cancel” button to return to “Edit” mode. The same
message will display if you left click on the “X” at the top right of the screen. (Also as below)

Additional Section Information:
Under the “Locations” section of an EDI Tender, for both “Shipper” and “Consignee”, the default view will show you the information received by the customer in red. (See example below)
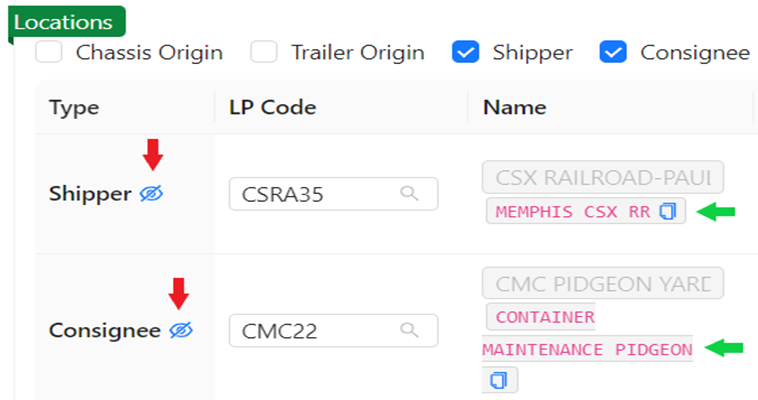

All of the below six (6) “Locations” will default to being selected and displayed. If you wish to view fewer Locations”, left click in the box to the left to deselect that Location. (See below)

NOTE: The “Locations” you select will become your default view going forward and until changed.
The location fields use typeahead. To locate a specific Location Profile, left click in the field and start typing the name of the customer, the city or the LP code itself. Any results matching the entered search information will be displayed. If applicable, left click on a displayed LP line to update. (See example below)
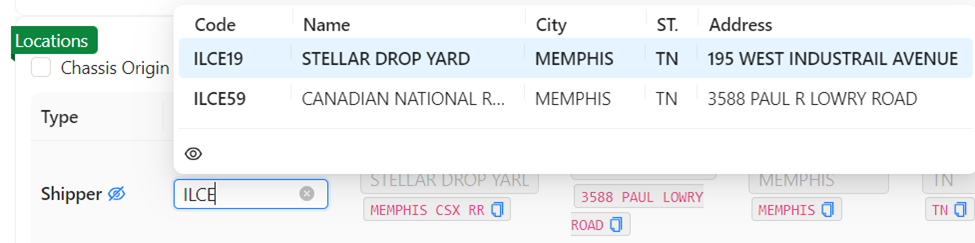
Alternatively, you can left click on the blue “copy” button located to the right of the customer’s Edi information and paste it into the “LP Code” field to search for active LP codes. (As below)

Instead of selecting an EDI Tender and left clicking on “Edit” on the Action Bar to perform a “Deeper” edit, a “Quick Edit” function is available by double left clicking on and EDI Tender line. The line will turn blue and certain fields will become editable. (See abbreviated snapshot below)

Once any fields have been updated, left click on the “Save” button in the “Action Bar”. (As below)

"BULK EDIT”
More than one EDI Tender line can be edited at the same time. First, select the box to the left of the EDI Tender line(s). Next, left click on the “Edit” button on the “Action Bar”. (As below)

The worksheet will open up the selected lines to be edited. Note that multiple fields can be edited in different lines prior to saving.
HINT: To navigate more quickly between line fields, hold down the “CTRL” key and use the directional arrows on the keyboard to move left & right in a tender line or up & down to another line.
Users can also update multiple lines in the same column with the same data. As an example, if the CSR userid needed to be updated in 3 (three) records, first type (or select from the dropdown menu if applicable) the new data in the field on the first EDI Tender line. Next, left click on the “Update All” button on the “Action Bar” which is now active. (As below)
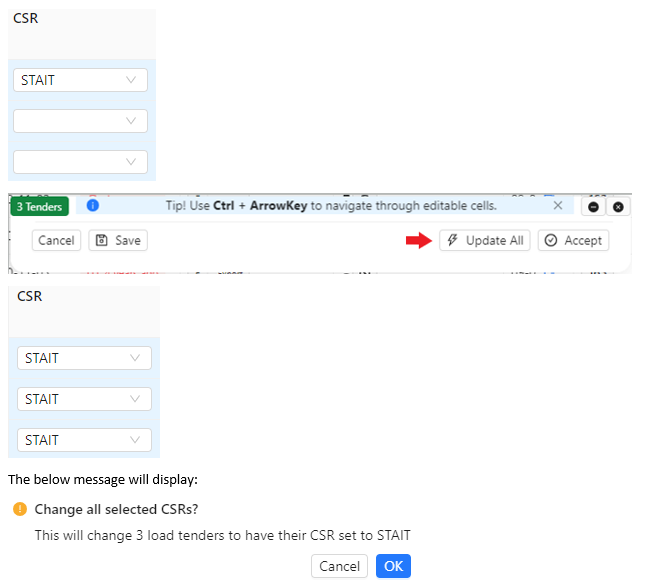
Left click on the “Cancel” button to return to editing. Left click on the blue “OK” button to execute the change.
Lastly, left click on the “SAVE” button on the “Action Bar” to save the change!
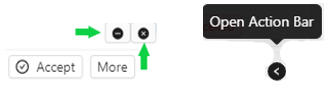
ADDED NOTE: To HIDE or minimize the “Action Bar”, left click on the “-” symbol located at the top right of the “ActionBar”. To UNHIDE the “Action Bar”, left click on the left arrow “Open Action Bar” visible at the bottom right of the worksheet. To close the “Action Bar” and “deselect” any tenders, left click on the “x” at the top right of the “Action Bar”. (All as below)