Para acceder al Portal de Driver Document Management, desde el menú principal de SWS ve a Easy Operations, da clic izquierdo en Driver Information, luego da clic izquierdo en Driver Document Management.
Una vez que hayas consultado a un conductor específico o una lista de conductores por división o por despachador asignado, si hay documentos que requieren auditoría, se van a mostrar en orden descendente en la columna “Needing Audit”. (Ve el ejemplo de abajo) ***Consulta la NOTA ESPECIAL al final de esta sección.***
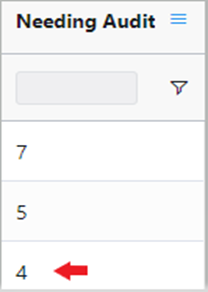
Haz clic izquierdo en cualquier fila para mostrar los Pros que necesitan ser auditados. En el ejemplo de arriba, el conductor seleccionado tiene cuatro (4) documentos que requieren auditoría. La pantalla de abajo se muestra detallando los números de Pro afectados. En este ejemplo, hay tres (3) Pros afectados y un total de cuatro (4) documentos que indican “Audit Required”.
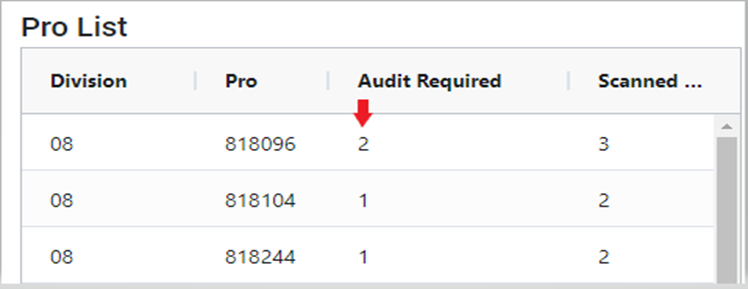
Haz clic izquierdo en cualquier fila para mostrar el o los documentos que necesitan ser auditados.
Un “Move List” y “Document List” se mostrarán. (Como abajo)
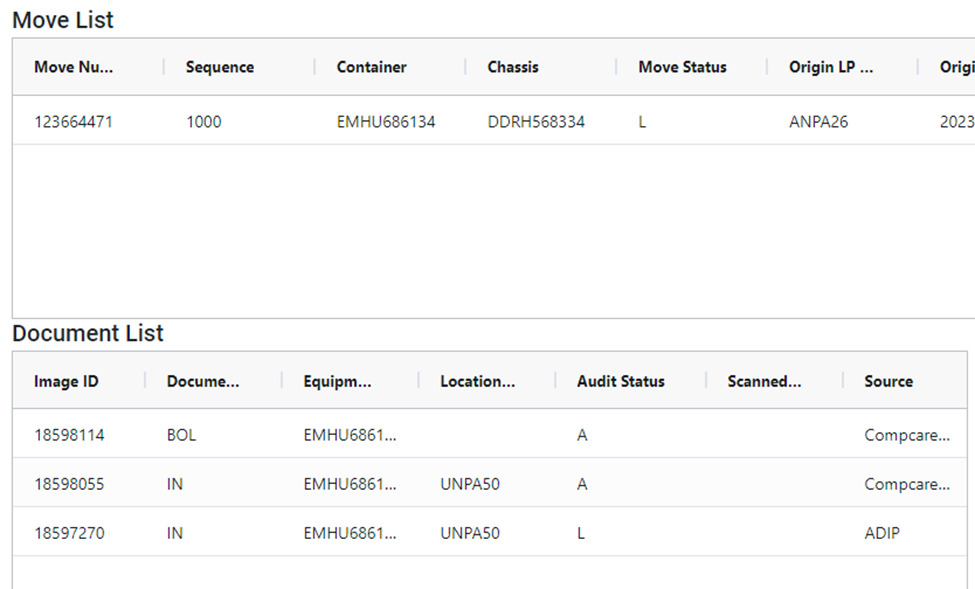
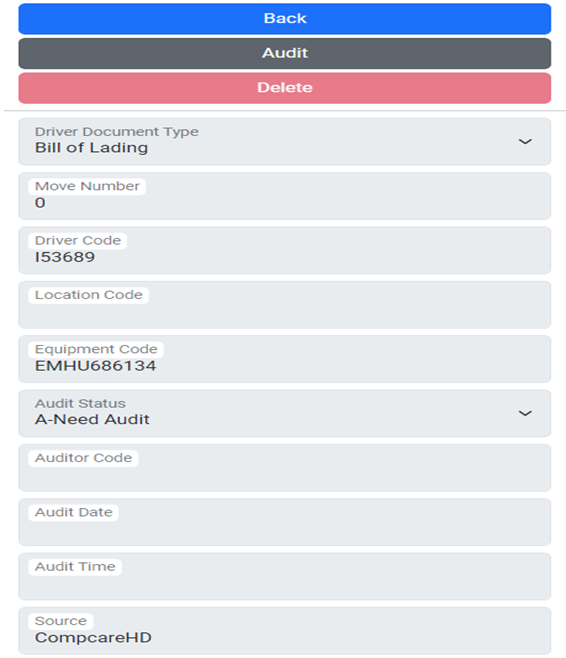
“A” en la columna ”Audit Status” indica que el documento necesita ser auditado para que aparezca en SmartDoc. Haz clic izquierdo en una línea de imagen que necesite ser auditada y la imagen del documento aparecerá a la derecha. (Ver ejemplo abajo)
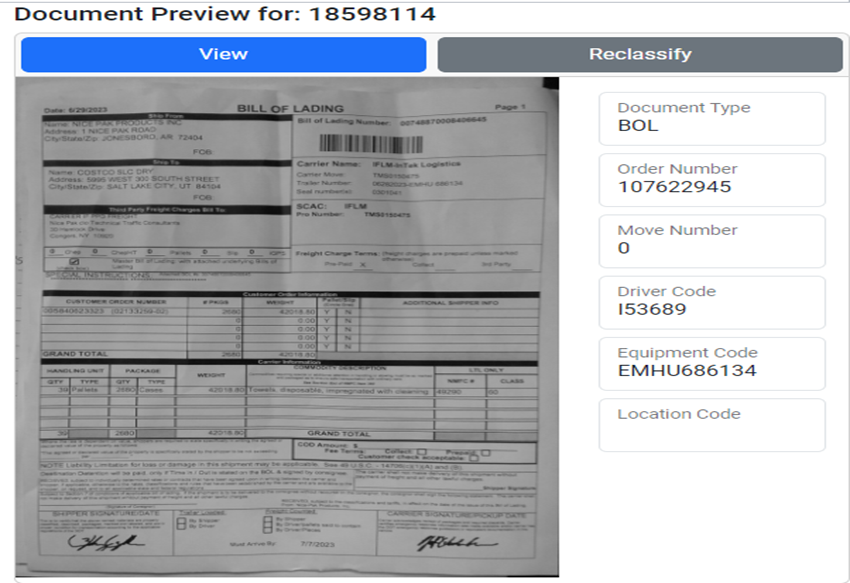
Después, haz clic izquierdo en el botón azul ”View”.
Se mostrará una vista más grande de la imagen seleccionada junto con algunos botones de acción adicionales. (Como abajo)
La opción de hacer zoom acercar/alejar, rotar la imagen, etc. está disponible usando las siguientes opciones:

NOTE: Para regresar a la pantalla anterior, haz clic izquierdo en el botón azul “Back”
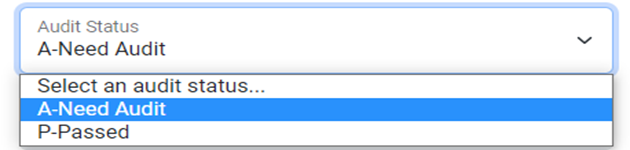
Luego, haz clic izquierdo en el botón ”Audit”. (Como arriba). Esto va a desbloquear el cuadro ”Audit Status” de abajo. Si el documento que estás viendo está correctamente clasificado (tipo de documento de conductor) y es legible, haz clic izquierdo en la flecha del menú desplegable y luego haz clic izquierdo en ”P-Passed”.
NOTE: Para regresar a la pantalla anterior, haz clic izquierdo en el botón azul “Back”
Haz clic izquierdo en el botón ”Cancel” para abortar el proceso. Haz clic izquierdo en el botón verde ”Submit” para guardar la actualización. (Ver abajo)

La “Document List” volverá a mostrarse con el documento de conductor auditado previamente en estado “P” o ”Passed”. (Como abajo)

Selecciona el siguiente documento de chofer que requiere auditoría y sigue los mismos pasos hasta que todos los documentos se hayan actualizado a “P”.
NOTA ESPECIAL: Para evitar auditar un Pro a la vez, haz clic izquierdo en el botón verde “Audit All” en la parte superior de la pantalla. (Como abajo) Esta opción permite que todos los Pros y los documentos asociados se auditen al mismo tiempo.

Cambiar número de Pro
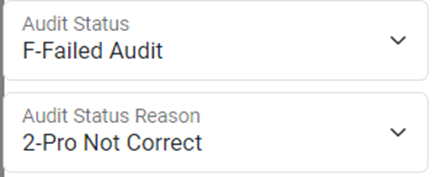
En caso de que un chofer haya subido un documento que pertenece a otro Pro #, sigue los mismos pasos de auditoría que se explicaron anteriormente. Al actualizar el “Audit Status” y “Audit Status Reason”, selecciona “F-Failed Audit” y “2-Pro Not Correct”. (Como se muestra abajo)
Después, da clic izquierdo en el botón verde ”Submit”. Se mostrará la ventana emergente de abajo:

Para asignar el documento a un nuevo Pro #, primero selecciona el Pro # correcto en el menú desplegable y luego haz clic izquierdo en el botón azul “Yes, Add New Pro”. (Como arriba)
El sistema luego te pedirá que audites el nuevo documento. Ejemplo abajo:
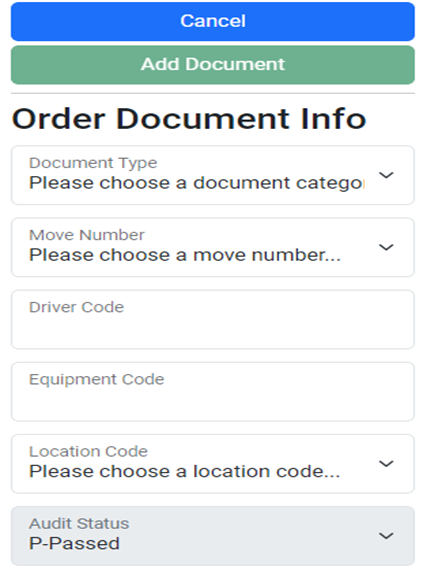
Una vez que se hayan seleccionado los menús desplegables requeridos, el botón verde “Add Document” se vuelve funcional. Haz clic izquierdo en este botón para agregar el documento recién auditado al Pro # correcto.
NOTA: El documento seguirá en DDM bajo el Pro # incorrecto como documento fallido y también será visible en el Pro # recién asignado.
Para “rechazar” el documento bajo el Pro actual sin agregarlo a otro Pro, haz clic izquierdo en el botón rojo “Continuar sin agregar Pro”.
