Some divisions within IMC rely on outside carriers or vendors to cover all or part of their order moves. When these moves are outsourced either to one of IMC’s divisions or another vendor, we refer to this as brokerage. There are two types of brokerage: ICB and XCB. ICB stands for Internal Carrier Brokerage and XCB stands for External Carrier Brokerage.
From SWS main menu go to Customer Service, click on Order Entry, then click on Order. Next, type a “Q” to “Query”. Type the Div/Pro for the Pro # you wish to Broker and hit the “Esc” key to display the Pro.
From the Command Line, type the “Hot” key to brokeR move(s) which is the letter “R”. Alternatively, you can use the “Tab” key or right directional arrow to position the white box over this header and hit “Enter”.

The below screen will display:
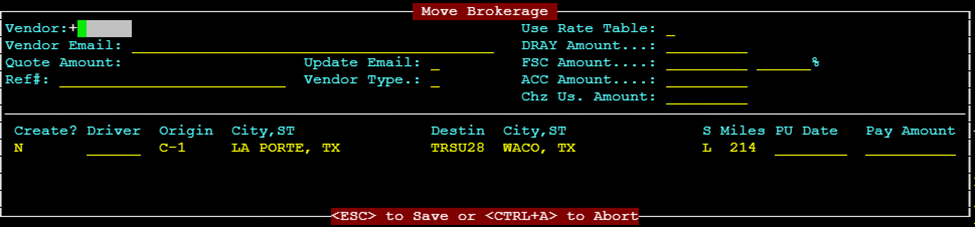
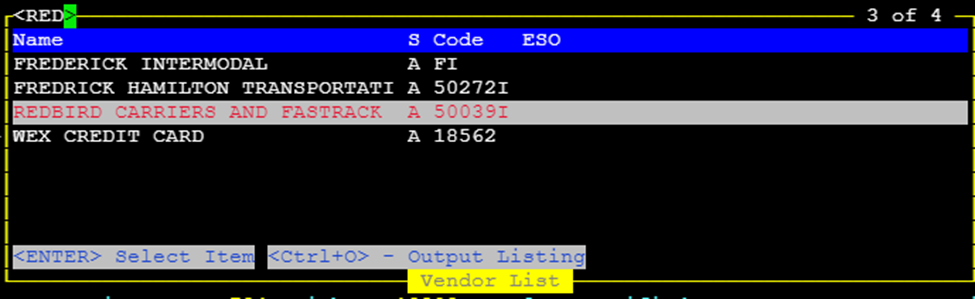
If the Vendor # is known type it in this field. If not known, use the Thumb function “CTRL-T” within the field to display a list of available vendors. Start typing the name of the Vendor and once located and is highlighted in white (see example below) press the “Enter” key to select that Vendor:
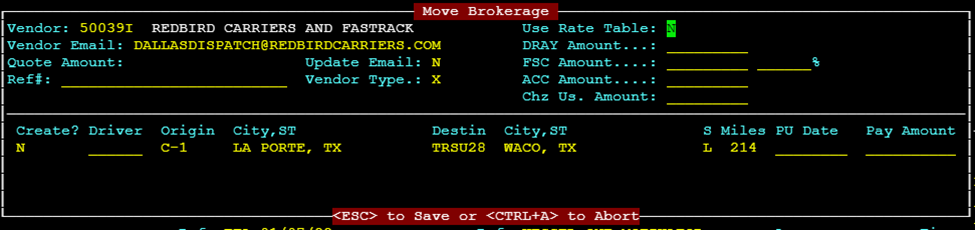
Cursor will advance to the Use Rate Table: field. If the Bill-To on the order already has a Table Rate attached this field will default to “Y” for Yes. Otherwise, it will default to “N” for No. To enter a manual rate, this field but be set to “N”. You cannot change from “N” to “Y” if no Table Rate exists.
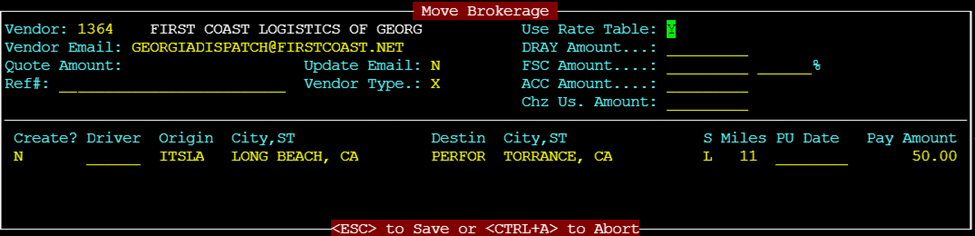
NOTE: If a rate table is pulled, the amount will show next to the line(s) of dispatch under Pay Amount.
Hit the “Tab” key to advance to the Vendor Email: field. This field will auto populate unless the vendor has not been used before. If necessary, type in the email address using the correct format and hit the “Tab” key to advance to the next field.
Update Email: If you entered a new vendor email address for the first time or had to enter an updated email address due to a contact change, etc., type a “Y” for Yes. The email address entered will be saved to the Vendor file and auto populate on future orders. Otherwise, this field will default to “N” for No. Hit the “Tab” key to advance to the next field.
DRAY Amount…: If using a rate table, you will not use this field and should hit the “Tab” key to advance the cursor to the next field. If outsourcing at a different rate, type just the base rate in this format: DD.CC where DD is the dollar amount, (.) is the decimal and CC the Cents. It is not necessary to enter a decimal for whole dollar rates as the system will auto populate .00. Hit the “Tab” key to advance to the next field.
FSC Amount…: % If applicable, type in the Fuel Surcharge percentage amount that is to be paid to the Vendor. If in whole numbers, it is not necessary to type the decimal. Hit the “Tab” key to advance to the next field.
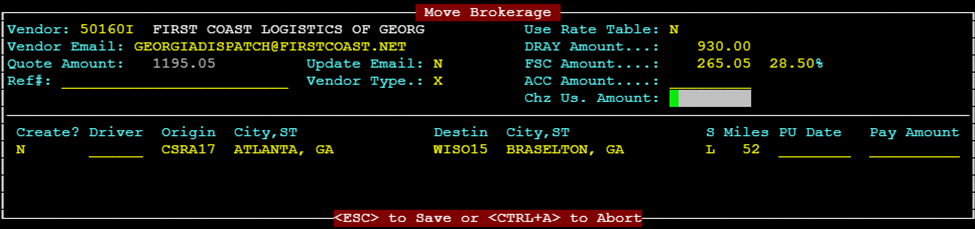
NOTE: If a # is entered in the FSC % field, the actual dollar amount will populate next to that field. (See example above 28.5% of $930 is $265.05). Also note the total sum of the DRAY amount and FSC Amount will auto populate to the Quote Amount: field.
(In the example above $930 + $265.05 = $1195.05)
This is the current amount due to be paid the specified vendor.
ACC Amount....: Stands for Accessorial Charge Amount This field is only available if a Vendor is a Non-XCB Vendor and would be used (if applicable) when the finalized Vendor Delivery Order (VDO) is created. Hit the “Tab” key to advance to the next field.
Chz Us. Amount: Stands for Chassis Usage Amount If applicable, would be used when sending the final VDO to a Non-XCB Vendor. Or, a Vendor could have a minimum chassis charge that could be entered here. Hit the “Tab” key to advance to the next field.
Ref#: Stands for Vendor Reference Number Data typed in this field does not appear on the VDO. Hit the “Tab” key to advance to the next field.
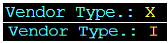
NOTE: Vendor Type.: This is not an editable field. X stands for XCB or external carrier brokerage order and I stands for ICB or internal carrier brokerage order as below:
The Cursor will now be on the first line or “leg” of dispatch and highlighted in white as below:
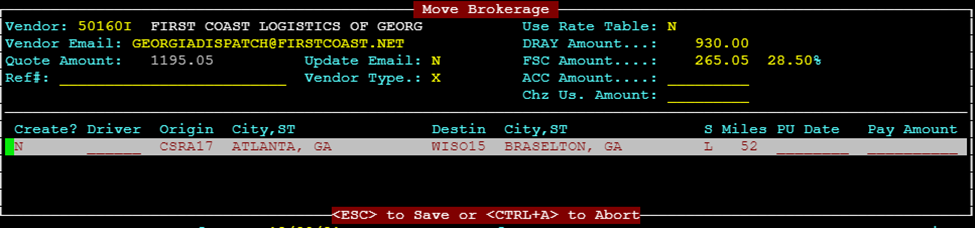
Type a “Y” under the Create? header and hit the “Enter” key. This message will appear at the bottom of the screen:

The cursor will move to the next leg of dispatch (if applicable). Repeat this step until all dispatch legs you want to send to the specified Vendor have been marked with a “Y”.
(See example below for multi leg Pro)

Next hit the “Esc” key. The below message will appear within the brokerage move box on the screen:

If the legs of dispatch you wish to broker have all been correctly selected with a “Y”, type a “Y” then hit the “Esc” key.
NOTE: If you see that a mistake has been made you can use the CTRL A function to Abort the process or type a “N” and hit the “Enter” key to start the brokerage process over.
If “Y” is selected an order created message will appear at the bottom of the screen.
NOTE: The below message will display for a Non-XCB Vendor
Vendor Order Created and Sent - Image Name(s):
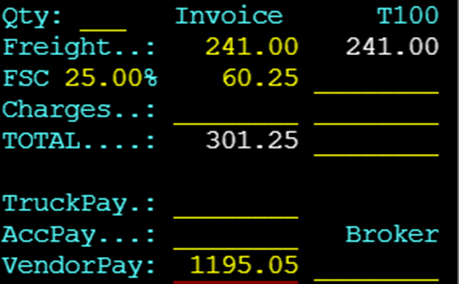
If you hit the “F8” key, you can view the assigned Vendor & Costs. (See example below)

Once a leg or legs of dispatch have been brokered, there will be a dollar amount in the VendorPay field in the order screen. (See example below)
NOTE: You should update/input data in the driver & truck fields on the equipment move lines sent to a Non-XCB Vendor so that the Order Status changes from R Ready to A Assigned. See examples below:


NOTE: For XCB enabled Vendors, once the desired lines of dispatch have been brokered to them, the below message will display at the bottom of the screen. An XCB # will be created.

In this case, the Driver and Truck fields will auto populate with Driver 999 (Service Substitute indicates brokered leg) and the Vendor # assigned to the order. (See below example)
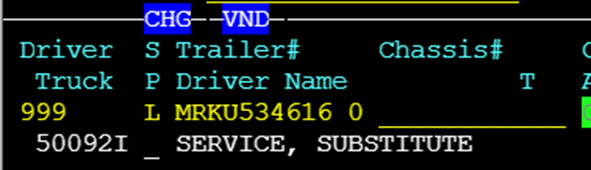
Also, the Vendor Code & name will appear in the Carrier field. (As below)
A Vendor Delivery Order or VDO will be sent to the email address on file for that Vendor and can be accessed by typing an “I” for “Imaging” from the Command line when the order is displayed.

If the vendor is XCB enabled:
From SWS main menu go to Customer Service, click on Order Entry, then click on Order. Next, type a “Q” to “Query”. Type the Div/Pro for the Brokered Pro # you wish to void and hit the “Esc” key to display the Pro.
Next, from the command line, you can use the “Hot key” and type an “H” for brokerage

A brokerage record will display (example below):

From the Command line, type an “X” or select “eXternal” order and hit the “Enter” key.
Type a “U” to update. The cursor will be positioned on the first leg of dispatch which will be highlighted in white. Hit the “Delete” key to erase each leg of dispatch.

Next, hit the “Esc” key. The cursor will reposition to the Command line. Type a “D” for Delete and the below message will display:

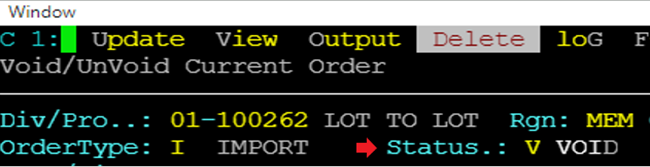
Type a “Y” and hit the “Enter” key. The order Status will update to “V” for Void as below:
Hit the “Esc” button to close the external order. Hit the “Esc” button again to close the brokerage record. The original Order screen will then be displayed. If you Query the Pro again it will be available to broker with no Vendor assigned.
For a Non-XCB Vendor:
From SWS main menu go to Customer Service, click on Order Entry, then click on Order. Next, type a “Q” to “Query”. Type the Div/Pro for the Brokered Pro # you wish to void and hit the “Esc” key to display the Pro.
From the command line, type a “U” to update. Next hit the F8 key to display Acc/Vend costs
Use the down arrow to position the cursor over the charge line you wish to delete. (Line will be highlighted in white as below)

Hit the “Delete” Key to erase the assigned Vendor & Cost. Hit the “Esc” to save the changes.
NOTE: For ICB records, that division must decline the order through the Brokerage Record below. Order can then be brokered to another vendor. If that division has already accepted the ICB, the Pro must be voided. (See Voiding an Order Module)


SPECIAL NOTE: If a Vendor has not been paid on the move, the Vendor Freight Rate can be updated manually without voiding the brokerage record and resending. Please refer to the training doc below for instructions.
Changing Vendor Freight Rate after Brokering | Sixth Wheel Software