Viewing Vendor Costs in a Pro
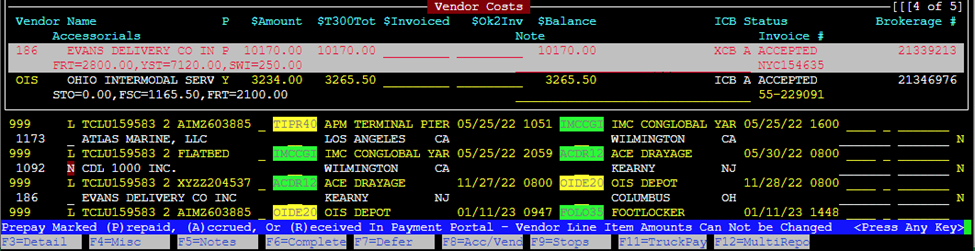
From “View” mode in the Order screen, hit the “F8” key to view “Accessorial Sales/Costs & Vendor Costs”. Vendor costs will be displayed by T300 accessorial alpha code. (As below)

The cost line will display up to 4 entries. … indicates more costs exist. (As below)

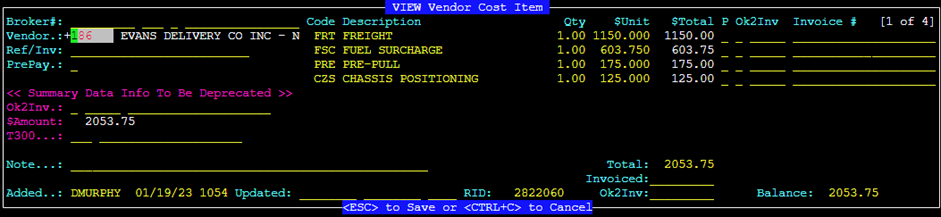
To view all Vendor costs, hit the ”Enter” key when the desired vendor is selected. (As below)

XCB & ICB processes remain the same. For XCB orders, Carriers will continue to submit costs by adding Rate adjustments in IMCPower. When rate/charge errors occur, ICB & XCB orders will need to be voided and resent.
For Non-XCB and ICB orders (on the carrier side), Vendor costs can be added via ”F8” in the order screen. From “Update” mode in the Order screen hit the “F8” key to view “Accessorial Sales/Costs & Vendor Costs”. Position the cursor below the last Vendor cost displayed and hit the “Enter” key.
Next, input the “Vendor” number or use the (Thumb function) “Ctrl T” to search for vendor number and then hit the right arrow to position the cursor under the “Code Description” header. (See below)
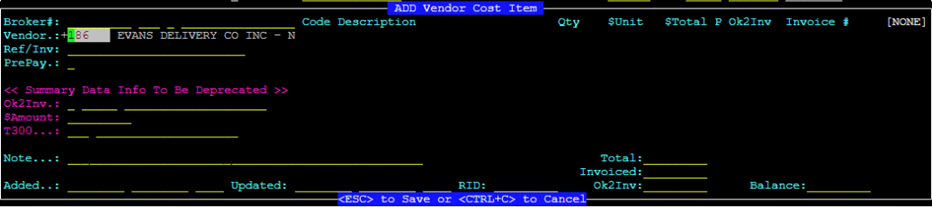
Next hit the “Enter” key or “Insert” key. Type the 3-character T300 alpha code in the field or use the (Thumb function) “Ctrl T” to search for code. (See below)

The “Description” line will auto populate. Type the ”Qty” (If greater than 1) and “$Unit”. The system will extend the cost to the “$Total” field. (See below)

To add another Vendor Cost, hit the “Esc” key and then the “Enter” or “Insert” key to input the next Vendor Cost. When all costs have been entered, hit the ”Esc” key twice to save the record.
XCB & ICB processes remain the same. When rate/charge errors occur, ICB & XCB orders will need to be voided and resent.
For Non-XCB and ICB orders (on the carrier side), Vendor costs can be edited via “F8” in the order screen. From “Update” mode in the Order screen hit the “F8” key to view “Accessorial Sales/Costs & Vendor Costs”. Position the cursor on the applicable Vendor cost line. Next, hit the ”Enter” key. Use the directional keys to position the cursor on the cost line that needs to be changed. Update the cost line(s) as necessary. Once all changes have been made, hit the “Esc” key twice to save the record. (See example below)
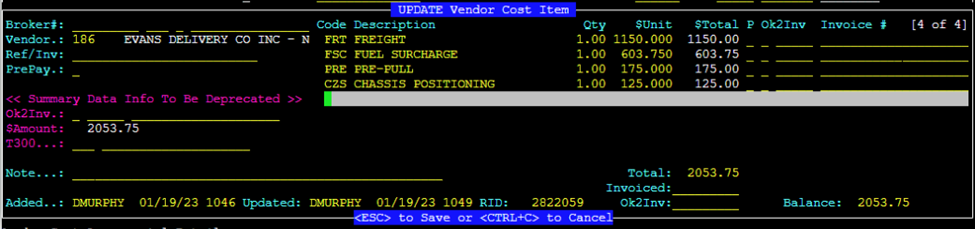
NOTE: If Vendor costs were entered manually and if applicable, the entire Vendor cost line can be deleted when highlighted. If edits/deletions are not allowed, the system will display the message: Vendor Payout Prepaid Status is P – Cannot Add/Delete Line Items or the error message below: