Para acceder al Optimizador de Despacho (O.D.) desde el menú principal de SWS, ve a Operaciones Fáciles, haz clic izquierdo en Despacho, luego haz clic izquierdo en Optimizador de Despacho.
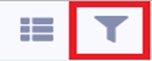
El botón "Filtro" se encuentra en la esquina superior izquierda del O.D. (como se muestra abajo) y se utiliza para crear filtros guardados así como manipular datos sobre conductores, movimientos de equipo y grupos de equipo para asistir en el proceso de despacho de conductores.
El O.D. almacenará un total de 15 (quince) filtros guardados. Cada filtro puede ser nombrado individualmente y aparecerá en un menú desplegable ubicado en la parte superior del O.D. Para usuarios nuevos, "Predeterminado" será el nombre del primer filtro al iniciar la aplicación. (Como se muestra abajo)
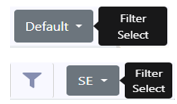
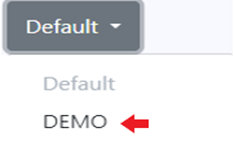
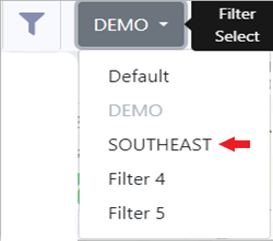
Left click on the “Filter Select” dropdown button to view all saved filters. Left click on the filter you wish to view and/or change.
To ADD a filter, first left click on the “Filter” button, then left click on the “+” sign. (As below)

In the example below, only the “Default” filter exists so the default name for the next added filter is “Filter 2”. (As below)

To rename the filter, type the desired information in the “Name” field and then left click on the disk button to the far right of the field. (As below)

This new filter is now saved in the “Filter Select” dropdown. (As below)
NOTE: To rename an already saved filter, after selecting the filter from the “Filter Select” dropdown follow the same steps as above to rename the filter.
To DELETE a filter, select the filter from the “Filter Select” dropdown, then left click on the “-” sign. (As below)

PISTA: Asegúrate de seleccionar el filtro correcto antes de hacer clic en el signo "-". Una vez que elimines un filtro guardado, no se puede recuperar y debe recrearse.
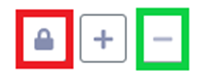
Para BLOQUEAR un filtro y evitar eliminación accidental, selecciona el filtro del menú desplegable "Filter Select", luego haz clic izquierdo en el símbolo en rojo abajo.
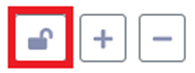
El filtro seleccionado mostrará "Bloqueado" y el signo "-" estará deshabilitado e inactivo. Haz clic izquierdo en el símbolo "Bloqueo" nuevamente para remover. (Como abajo)
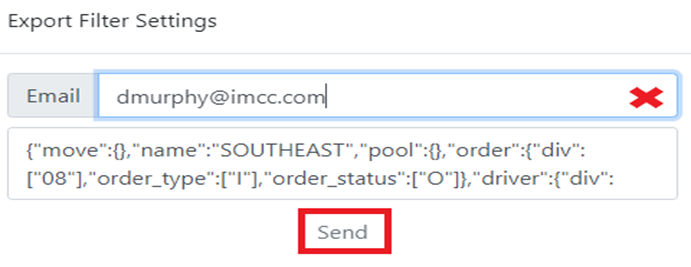
Para EXPORTAR un filtro guardado a otro usuario de D.O., desde el menú desplegable "Filter Select", haz clic izquierdo en el nombre del filtro primero, luego haz clic izquierdo en el botón Exportar. (Como abajo)

La siguiente ventana se mostrará. Escribe la dirección de correo electrónico del usuario al que deseas enviar el filtro en el campo "Email" y luego haz clic izquierdo en el botón "Send".
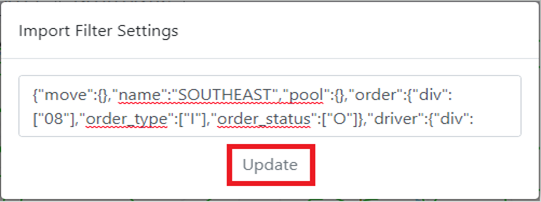
Para IMPORTAR un filtro que te ha sido exportado, primero abre el correo electrónico que fue enviado y copia TODO el texto en el cuerpo del correo. A continuación, haz clic izquierdo en el botón Import y pega TODOS los datos copiados del correo en el campo. A continuación, haz clic izquierdo en el botón "Update". (Como se muestra a continuación)

{"move":{},"name":"SOUTHEAST","pool":{},"order":{"div":["08"],"order_type":["I"],"order_status":["O"]},"driver":{"div":["08"]},"move_sort":"Rank","pool_sort":"Dropped Date","move_table":["4","13","28","29","15","2","11","9","30","23","60","70","17","67"],"driver_sort":"Assignments","equipment_table":["1","2","3","5","11","19","17"],"move_table_sort":[{"id":60,"type":"order","order":"dsc","data_type":"date","object_key":"clearthrulfd"}],"equipment_table_sort":[]}

RESULTADO: Se agregará un filtro con el mismo nombre y configuración al menú desplegable "Seleccionar Filtro".
NOTA: Debe haber espacio disponible para importar un filtro. Si ya existen 10 filtros guardados, uno debe ser eliminado antes de que se pueda importar un nuevo filtro.
Para CAMBIAR o establecer un filtro, desde el menú desplegable "Filter Select", haz clic izquierdo en el filtro guardado primero, luego haz clic izquierdo en el botón Filter. (Como se muestra abajo)
La siguiente ventana se mostrará:

NOTA: Para cerrar esta ventana en cualquier momento, haz clic izquierdo en cualquier lugar fuera de la ventana.
Confirma que el Nombre del filtro mostrado sea el que deseas cambiar. Hay 4 opciones de ordenamiento debajo del nombre del filtro (utilizadas para establecer vistas predeterminadas) seguidas de 4 pestañas que se pueden seleccionar para cambiar los filtros existentes individualmente. (Como se muestra arriba)
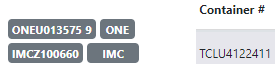
"Check Digit Visible" - Haz clic izquierdo en este botón de acción para cambiar a "Check Digit Hidden". El número de contenedor en todas las tarjetas de movimiento o listadas en la vista de tabla reflejará lo que se seleccione aquí.
”Default Move Sort Rank”- Left click on this action button to display a list of possible default Sort options for the available (Equipment) Moves or (Dispatch) Moves. Left click on the desired Sort to select that filter. (As below) Next, left click outside the filter window to close said window.
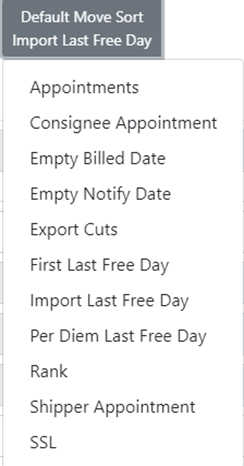
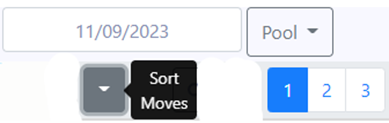
NOTE: These are the same sort options available from the “Sort Moves” dropdown in “Map” view. (See below)
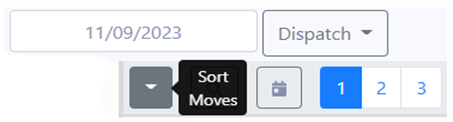
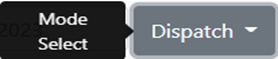
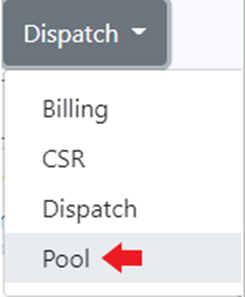
Once selected, to activate a default Move Sort, select another “MODE” from the dropdown and then select “Dispatch” Mode again to see the changes applied. (As below)
As an example, “Import Last Free Day” was selected as the Default Move Sort. “Dispatch” dropdown was changed to “Pool” then back to “Dispatch” mode. “Import Last Free Day” was then applied. (See example below)

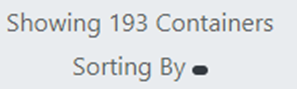
If “SSL” is selected, the Sort will not be applied and will display as below:
It will be necessary to reselect “SSL” from the “Sort Moves” dropdown & then select an actual SSL from the displayed list.
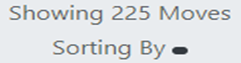
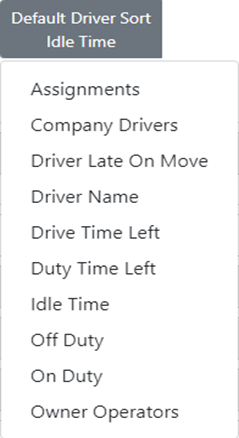
“Default Driver Sort Assignments”- Left click on this action button to display a list of possible default Driver Sort options. Left click on the desired Sort to select that filter. (As below) Next, left click outside the filter window to close said window.
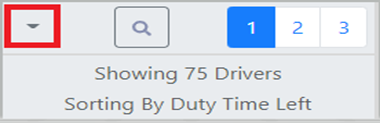
NOTE: These are the same sort options available from the Driver List dropdown in “Map” view. (See below)
Once selected, to activate a default Driver Sort, it is necessary to close the Dispatch Optimizer and then reopen the application.
“Default Pool Sort Dropped Date”- Left click on this action button to display a list of possible default Pool Sort options. Left click on the desired Sort to select that filter. (As below) Next, left click outside the filter window to close said window.
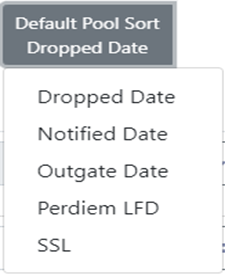
NOTE: These are the same sort options available from the “Sort Moves” dropdown from “Pool” mode in “Map” view. (See below)
Once selected, to activate a default Pool Sort, select another “MODE” from the dropdown and then select “Pool” Mode again to see the changes applied. Alternatively, if in “Dispatch” mode, when a new default Pool Sort is selected, the Sort will be active when “Pool” is selected from the Mode Select dropdown. (As below)
If “SSL” is selected, the Sort will not be applied and will display as below:
It will be necessary to reselect “SSL” from the “Sort Moves” dropdown & then select an actual SSL from the displayed list.
The 4 TABS below: “Order”, “Move”, “Driver” or “Pool” can also be used to CHANGE or set a filter.

Left click on any TAB to display the available filters. The “Order” TAB lists fields from the Order Screen. A few BASICS that apply to filters across all 4 TABS:
Any filter name that includes a dropdown arrow indicates there are multiple selections available. In the example below, multiple divisions can be selected by left clicking on the division # itself.
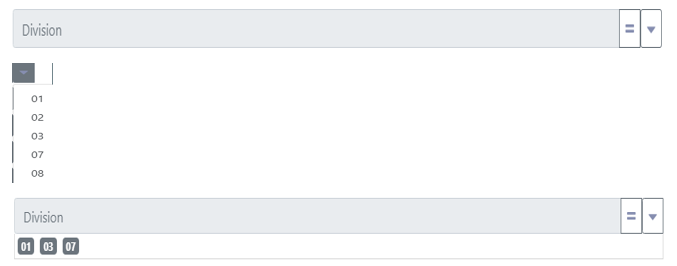
The selected values will be displayed within the field (as above). To DELETE a selection, simply left click on the value(s) you wish to delete.
NOTE: If no values are selected for a field that has a dropdown arrow, then All values will be displayed.
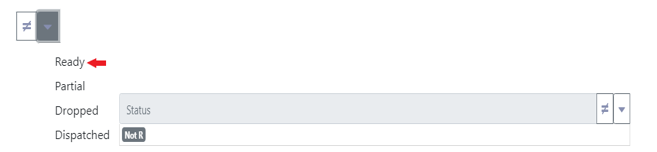
Fields displaying an “=” sign, left click on this button and it changes to Not = to. (As below)

As an example, the “Status” filter includes both options below:

Left click on the “=” sign to change to Not = to. Next, left click on the dropdown arrow and select “Ready” status. The Filter would then be set to show orders with all status types except Ready. “Not R” will display in the Status field. (As below)


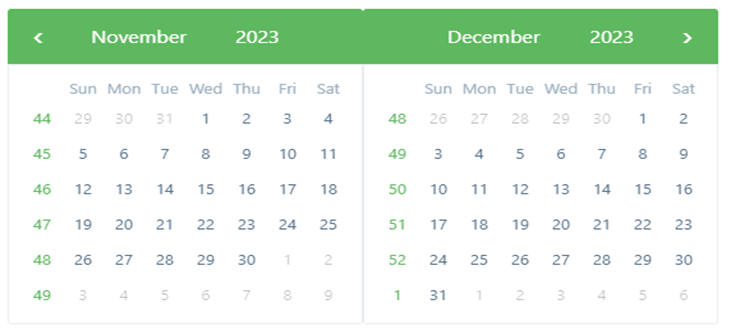
Para los campos que requieren entrada de fecha, haz clic izquierdo en el campo para mostrar un calendario. (Como se muestra abajo)


For those fields that have an “x”, left click on the x to execute the filter. The “x” will change to a Check Mark. (As below)

NOTA: Cualquier filtro seleccionado mientras se usa el D.O. se guardará automáticamente y seguirá aplicándose la próxima vez que se acceda al D.O. Asegúrate de revisar cada Pestaña para ver si hay filtros existentes y ajusta según sea necesario para garantizar la integridad de los datos mostrados.
NOTA ESPECIAL: En la Pestaña "Conductor", los dos filtros a continuación pueden ser especialmente útiles.

Cualquier filtro de Movimiento (Pestaña) que se haya establecido puede aplicarse a tu Lista de Conductores mostrada haciendo clic izquierdo en el botón de acción "x".
De manera similar, cualquier filtro de Orden (Pestaña) que se haya establecido puede aplicarse a tu Lista de Conductores mostrada haciendo clic izquierdo en el botón de acción "x".
Además, en la Pestaña "Grupo", estos 3 filtros existen para ayudarte a gestionar contenedores vacíos:

