The Moves function displays every equipment move associated with a queried Pro directly on the Order screen. It shows pick, mount, and drop details, equipment and driver information, scheduling data, and pay figures for each move, and lets authorized users add, edit, or delete moves without leaving the order.
Note: Users must be in Update mode to make any changes (add, edit, or delete) to Moves.
Use the Moves function when you need to:
Review all equipment moves tied to a queried Pro, including pick, mount, and drop legs.
Check origin and destination locations, dates, times, and appointment status for each move.
View pay-related figures — Company Pay, Miles, Extra Pay, Truck Cost, Fuel Cost, and Pay Move — for a specific move.
Add a new equipment move to the Pro.
Edit the details of an existing move, either individually or all at once.
Delete a move that is no longer needed.
Query the Pro to be reviewed.
Locate Moves on the Order screen's menu bar, next to Multi-Repo (F12). (As below)

Press <CTRL> M or left-click Moves to display the Move List.
NOTE: To return to the main Pro screen, press <CTRL> M again or press <CTRL> H.
Once opened, the Move List displays every equipment move recorded on the queried Pro, each shown as its own card. (See example below)
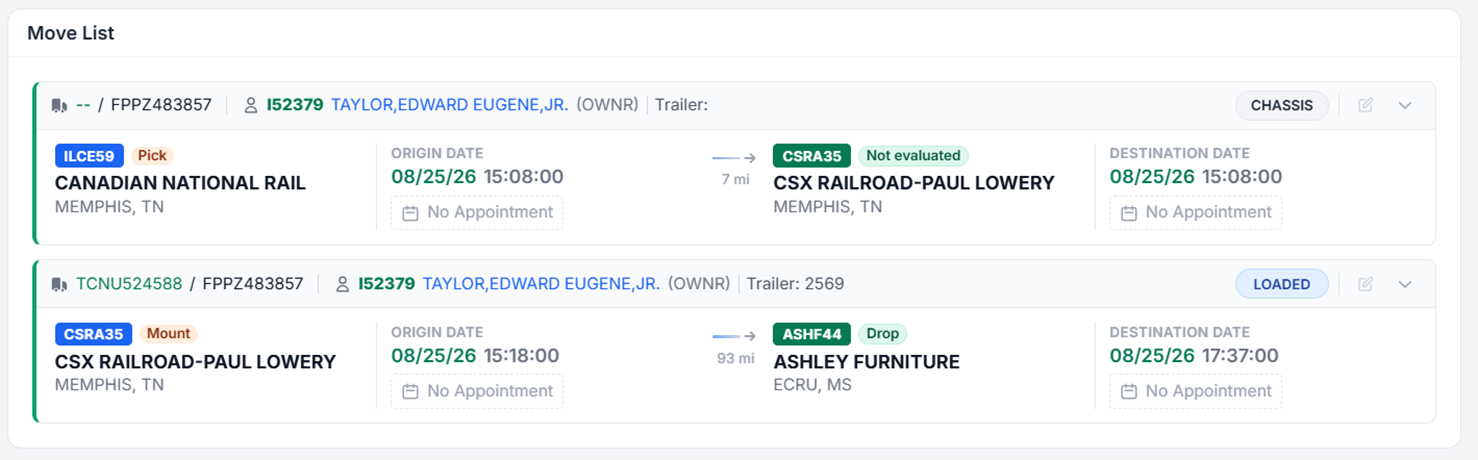
Equipment/Container ID — the trailer, chassis, or container number assigned to the move, along with its license plate.
Driver ID and Name — the driver assigned to the move, with a role tag such as (OWNR) for owner-operator or (CMPY) for company driver.
Trailer — the trailer number associated with the move, if applicable.
Status tag — the load status of the move, such as CHASSIS, LOADED, or EMPTY.
Pick/Mount/Drop tag — identifies the type of stop, such as Pick, Mount, or Drop.
Origin location and date/time — the origin stop name, city/state, and scheduled date and time, along with appointment status (e.g., No Appointment).
Destination location and date/time — the destination stop name, city/state, scheduled date and time, and appointment status. A status tag (e.g., Not evaluated, Drop) may also display next to the destination.
Mileage — the distance in miles between the origin and destination stops.
NOTE: Multiple move cards may display for a single Pro, representing each leg of the equipment's movement — for example, a Pick/Mount move followed by a separate Drop move.
Confirm the Order screen is in Update mode.
Locate the move to change and left-click the Edit (pencil) icon on that move's card. (As below)

An Edit Move window displays, showing fields such as Status, Move Type, Move Purpose, Driver ID, Tractor, Container, Chassis, Origin LP, Origin Date, Origin Time, Region, Division, Driver Name, Size, Owner, Destination LP, Destination Date, and Destination Time. (As below)

Make the necessary changes to the move.
Left-click Update to apply the changes or Cancel to abort.
Important: Once Update is used, the move displays a Pending Save label and is shaded yellow until the changes are committed at the Order level (see Saving or Canceling Move Changes below).
Confirm the Order screen is in Update mode.
Click the Edit All button above the Move List. (As below)

All equipment moves on the list open for editing at once.
Make the necessary changes, then click Update on each move, or Cancel to abort.
Confirm the Order screen is in Update mode.
Locate the move to remove and click the Delete (trash can) icon on that move's card. (As below)

A Confirm Delete window displays: "Are you sure you want to delete this move?" (As below)
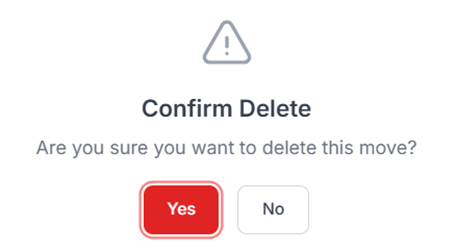
Click Yes to confirm the deletion, or No to abort.
Confirm the Order screen is in Update mode.
Hover the mouse just before or after an existing move in the Move List until an + Add move here bar appears. (As below)

Click the + Add move here bar. A Create Move window displays, showing the same fields as the Edit Move window — Status, Move Type, Move Purpose, Driver ID, Tractor, Container, Chassis, Origin LP, Origin Date, Origin Time, Region, Division, Driver Name, Size, Owner, Destination LP, Destination Date, and Destination Time. (As below)

Enter the necessary move information. Required fields are denoted with a red asterisk (*).
Click Save to add the move, or Cancel to abort.
Locate the move and click the Toggle Details down-arrow on that move's card. (As below)

The card expands to display pay information for the move: (As below)

Company Pay — the amount paid the company driver for the move.
Miles (F) — the miles associated with the move.
Extra Pay — any additional pay applied to the move.
Truck Cost — the calculated truck cost for the move.
Fuel Cost — the calculated fuel cost for the move.
Pay Move — indicates the pay status (e.g., P indicates Prepay).
Click the arrow again to collapse the details.
Any saved updates made to Moves — adding, editing, or deleting — display in yellow with a Pending Save label until they are committed at the Order level. (As below)

From the Order screen, click Save Update at the top right of the screen to commit all pending move changes. (As below)
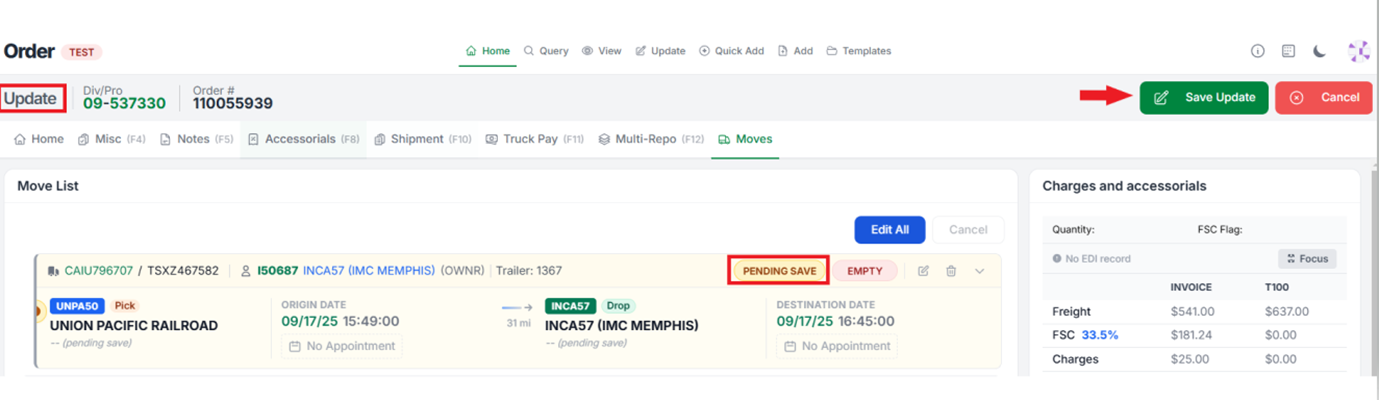
Click Cancel to abort all pending changes instead.
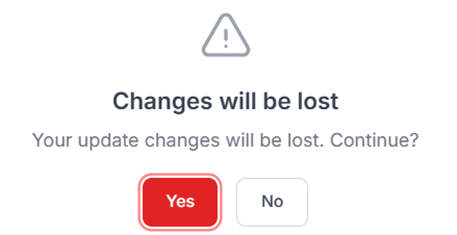
If Cancel is used while moves are pending save, a Changes will be lost confirmation displays. Click Yes to confirm the cancel, or No to return to the pending changes. (As below)