Some divisions within IMC rely on outside carriers or vendors to cover all or part of their order moves. When these moves are outsourced either to one of IMC’s divisions or another vendor, we refer to this as brokerage. There are two types of brokerage: ICB and XCB. ICB stands for Internal Carrier Brokerage and XCB stands for External Carrier Brokerage.
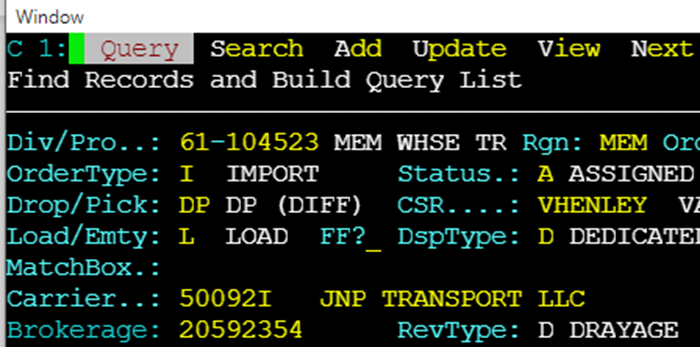
From SWS main menu go to Customer Service, click on Order Entry, then click on Order. Next, type a “Q” to “Query”. Type the Div/Pro for the Pro # you wish to Broker and hit the “Esc” key to display the Pro.
From the Command Line, type the “Hot” key to brokeR move(s) which is the letter “R”. Alternatively, you can use the “Tab” key or right directional arrow to position the white box over this header and hit “Enter”.

The below screen will display:
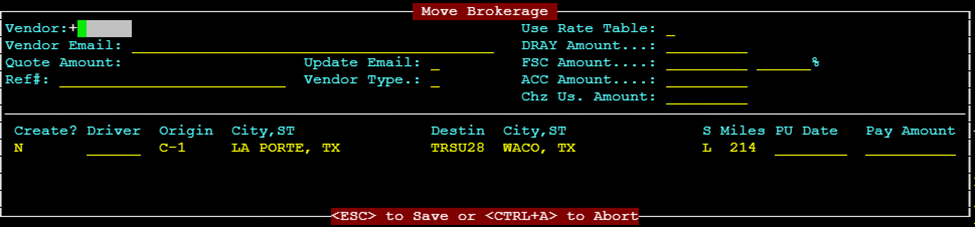
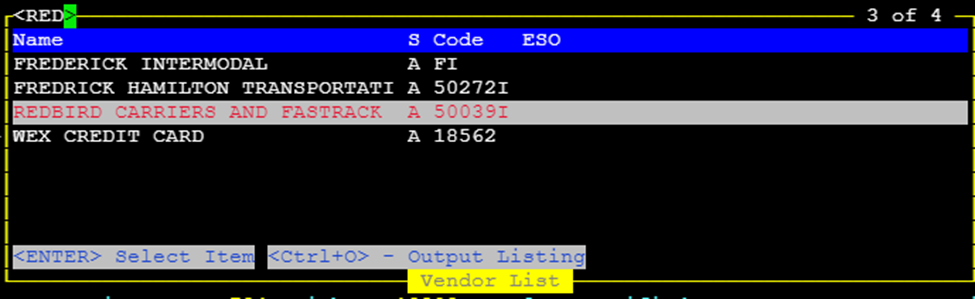
If the Vendor # is known type it in this field. If not known, use the Thumb function “CTRL-T” within the field to display a list of available vendors. Start typing the name of the Vendor and once located and is highlighted in white (see example below) press the “Enter” key to select that Vendor:
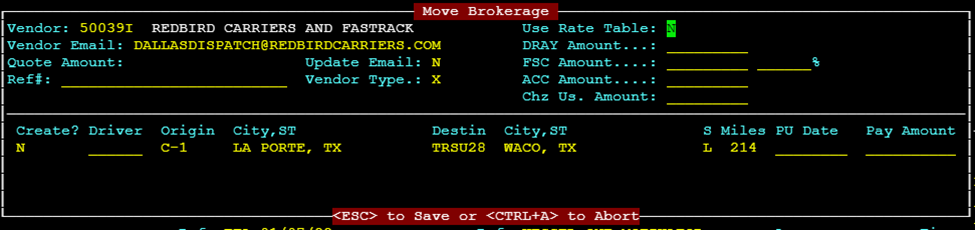
Cursor will advance to the Use Rate Table: field. If the Bill-To on the order already has a Table Rate attached this field will default to “Y” for Yes. Otherwise, it will default to “N” for No. To enter a manual rate, this field but be set to “N”. You cannot change from “N” to “Y” if no Table Rate exists.
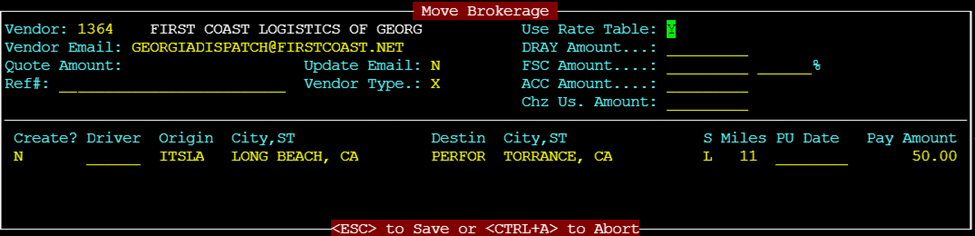
NOTE: If a rate table is pulled, the amount will show next to the line(s) of dispatch under Pay Amount.
Presiona la tecla "Tab" para avanzar al campo Vendor Email: Este campo se completará automáticamente a menos que el proveedor no haya sido utilizado antes. Si es necesario, escribe la dirección de correo electrónico usando el formato correcto y presiona la tecla "Tab" para avanzar al siguiente campo.
Update Email: Si ingresaste una nueva dirección de correo electrónico del proveedor por primera vez o tuviste que ingresar una dirección de correo electrónico actualizada debido a un cambio de contacto, etc., escribe una "Y" para Sí. La dirección de correo electrónico ingresada se guardará en el archivo del Proveedor y se completará automáticamente en pedidos futuros. De lo contrario, este campo tendrá el valor predeterminado "N" para No. Presiona la tecla "Tab" para avanzar al siguiente campo.
DRAY Amount…: If using a rate table, you will not use this field and should hit the “Tab” key to advance the cursor to the next field. If outsourcing at a different rate, type just the base rate in this format: DD.CC where DD is the dollar amount, (.) is the decimal and CC the Cents. It is not necessary to enter a decimal for whole dollar rates as the system will auto populate .00. Hit the “Tab” key to advance to the next field.
FSC Amount…: % If applicable, type in the Fuel Surcharge percentage amount that is to be paid to the Vendor. If in whole numbers, it is not necessary to type the decimal. Hit the “Tab” key to advance to the next field.
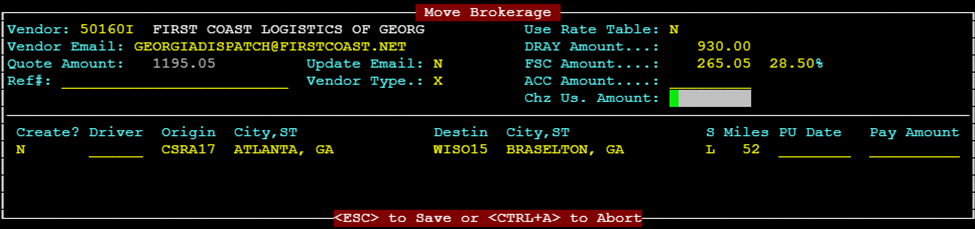
NOTA: Si se ingresa un # en el campo FSC %, el monto en dólares real se completará junto a ese campo. (Vea el ejemplo anterior 28.5% de $930 es $265.05). También tenga en cuenta que la suma total del monto DRAY y Monto FSC se completará automáticamente en el campo Monto de Cotización: .
(En el ejemplo anterior $930 + $265.05 = $1195.05)
Este es el monto actual a pagar al proveedor especificado.
ACC Amount....: Stands for Accessorial Charge Amount This field is only available if a Vendor is a Non-XCB Vendor and would be used (if applicable) when the finalized Vendor Delivery Order (VDO) is created. Hit the “Tab” key to advance to the next field.
Chz Us. Amount: Stands for Chassis Usage Amount If applicable, would be used when sending the final VDO to a Non-XCB Vendor. Or, a Vendor could have a minimum chassis charge that could be entered here. Hit the “Tab” key to advance to the next field.
Ref#: Significa Número de Referencia del Proveedor Los datos escritos en este campo no aparecen en el VDO. Presiona la tecla "Tab" para avanzar al siguiente campo.
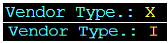
NOTA: Tipo de Proveedor.: Este no es un campo editable. X significa XCB u orden de corretaje de transportista externo e I significa ICB u orden de corretaje de transportista interno como se muestra a continuación:
El cursor ahora estará en la primera línea o "tramo" del despacho y resaltado en blanco como se muestra a continuación:
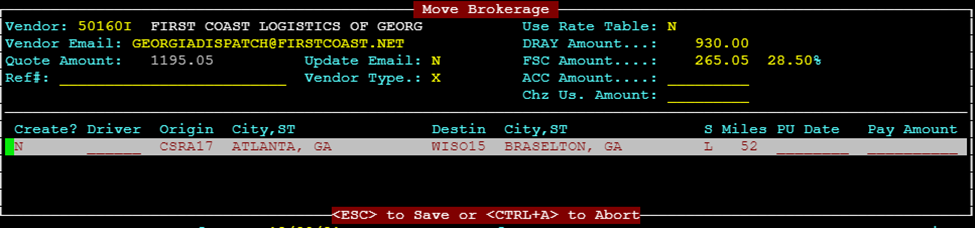
Type a “Y” under the Create? header and hit the “Enter” key. This message will appear at the bottom of the screen:

The cursor will move to the next leg of dispatch (if applicable). Repeat this step until all dispatch legs you want to send to the specified Vendor have been marked with a “Y”.
(See example below for multi leg Pro)

Next hit the “Esc” key. The below message will appear within the brokerage move box on the screen:

If the legs of dispatch you wish to broker have all been correctly selected with a “Y”, type a “Y” then hit the “Esc” key.
NOTE: If you see that a mistake has been made you can use the CTRL A function to Abort the process or type a “N” and hit the “Enter” key to start the brokerage process over.
If “Y” is selected an order created message will appear at the bottom of the screen.
NOTE: The below message will display for a Non-XCB Vendor
Vendor Order Created and Sent - Image Name(s):
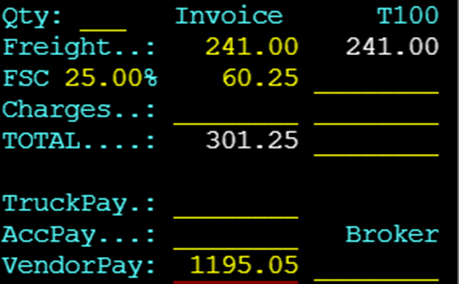
If you hit the “F8” key, you can view the assigned Vendor & Costs. (See example below)

Once a leg or legs of dispatch have been brokered, there will be a dollar amount in the VendorPay field in the order screen. (See example below)
NOTA: Debes actualizar/ingresar datos en los campos de conductor y camión en las líneas de movimiento de equipo enviadas a un Proveedor No-XCB para que el Estado de la Orden cambie de R Listo a A Asignado. Ver ejemplos a continuación:


NOTA: Para Vendedores con XCB habilitado, una vez que las líneas de despacho deseadas les hayan sido asignadas, el siguiente mensaje se mostrará en la parte inferior de la pantalla. Se creará un número XCB.

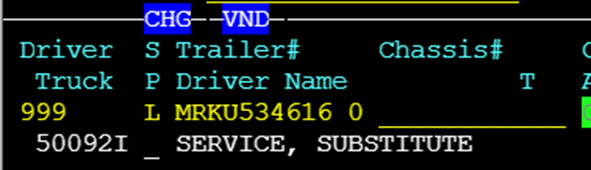
En este caso, los campos Conductor y Camión se completarán automáticamente con Conductor 999 (Sustituto de Servicio indica tramo asignado) y el número de Vendedor asignado a la orden. (Ver ejemplo a continuación)
Además, el Código de Proveedor y el nombre aparecerán en el campo Carrier. (Como se muestra a continuación)
Una Orden de Entrega del Proveedor u OEP se enviará a la dirección de correo electrónico registrada para ese Proveedor y se puede acceder escribiendo una "I" para "Imaging" desde la línea de comandos cuando se muestre la orden.

Si el proveedor está habilitado para XCB:
Desde el menú principal de SWS, ve a Customer Service, haz clic en Order Entry, luego haz clic en Order. A continuación, escribe una "Q" para "Query". Escribe el Div/Pro del número de Pro intermediario que deseas anular y presiona la tecla "Esc" para mostrar el Pro.
A continuación, desde la línea de comandos, puedes usar la "Tecla de acceso rápido" y escribir una "H" para intermediación

Se mostrará un registro de intermediación (ejemplo a continuación):

Desde la línea de comandos, escribe una "X" o selecciona "eXternal" y presiona la tecla "Enter".
Escribe una "U" para actualizar. El cursor se posicionará en la primera etapa del despacho que se resaltará en blanco. Presiona la tecla "Delete" para borrar cada etapa del despacho.

A continuación, presiona la tecla "Esc". El cursor se reposicionará en la línea de comandos. Escribe una "D" para Eliminar y se mostrará el siguiente mensaje:

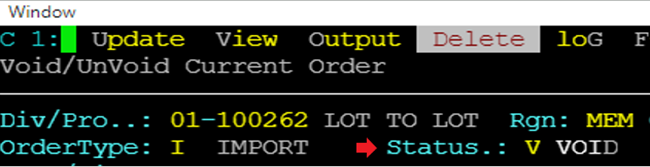
Type a “Y” and hit the “Enter” key. The order Status will update to “V” for Void as below:
Hit the “Esc” button to close the external order. Hit the “Esc” button again to close the brokerage record. The original Order screen will then be displayed. If you Query the Pro again it will be available to broker with no Vendor assigned.
Para un Proveedor Non-XCB:
Desde el menú principal de SWS ve a Customer Service, haz clic en Order Entry, luego haz clic en Order. A continuación, escribe una "Q" para "Query". Escribe el Div/Pro del número de Pro Brokered que deseas anular y presiona la tecla "Esc" para mostrar el Pro.
Desde la línea de comandos, escribe una "U" para actualizar. A continuación presiona la tecla F8 para mostrar Acc/Vend costs
Usa la flecha hacia abajo para posicionar el cursor sobre la línea de cargo que deseas eliminar. (La línea se resaltará en blanco como se muestra a continuación)

Hit the “Delete” Key to erase the assigned Vendor & Cost. Hit the “Esc” to save the changes.
NOTE: For ICB records, that division must decline the order through the Brokerage Record below. Order can then be brokered to another vendor. If that division has already accepted the ICB, the Pro must be voided. (See Voiding an Order Module)


NOTA ESPECIAL: Si un Proveedor no ha sido pagado en el movimiento, la Tarifa de Flete del Proveedor se puede actualizar manualmente sin anular el registro de corretaje y reenviar. Por favor, consulta el documento de capacitación a continuación para obtener instrucciones.
Changing Vendor Freight Rate after Brokering | Sixth Wheel Software
